

Needless to say, I’m a huge fan of painting things you already have around the house to make pretty decorative accents. It’s like recycling and getting something for free at once. It’s almost like that saying…one man’s trash is another man’s treasure. Except for it’s your own stuff, so more like ‘one man’s trash is that same (wo)man’s treasure’. I’m not great with sayings, obviously.

If anything, it gives you another reason to pick up a bottle of wine!
This is what I started with, just two average looking empty wine bottles. You don’t even have to restrict yourself to wine. Any glass bottle would work, just look for a shape that appeals to you!
First off, you want to wash the bottle and remove all foil and labels, as well as any glue. If you’re new to this – hot water, a little dish detergent, and scrub with the rough side of the sponge.
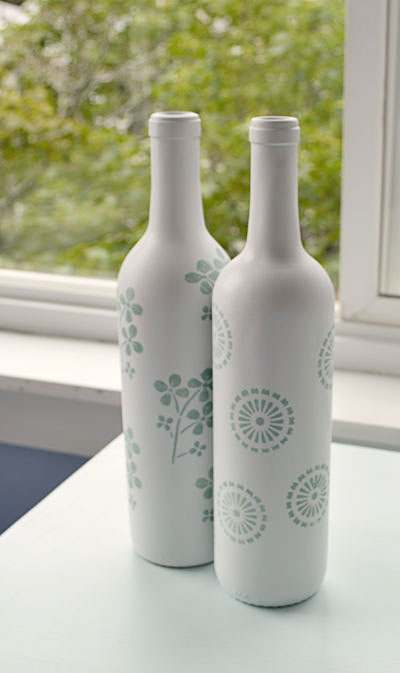
You want to start by giving your bottles two coats of spray paint. I kept mine right side up and went around to apply thin, even, coats. Since I didn’t paint it upside down, the bottom of the bottles is clear. If you can figure out a way to balance a wine bottle upside down long enough for the paint to dry, go for it.
You can easily stop there. The painted bottles themselves have such a clean and simple look to them. If you’re looking to jazz things up a bit, proceed with the stenciling!
This was ridiculously easy, thanks to Martha Stewart Crafts!
You need:
- Acrylic Craft Paint
- Craft Stencils – I used these
- Stencil brush/foam applicator – I used the foam pouncers
- Matte protective clear coating (optional)

These stencils are the greatest! As usual, anything by Martha exceeds my expectations. They’re adhesive, so they are great for anything curved. Now, I have no idea how this is even possible, but as you wash them…they lose stickiness, but when dry they become adhesive again so you can stick them back on the plastic to store for future use! I don’t know how you think of these things, Martha (I’m aware that the Martha Stewart corporation is a large corporation with thousands of designers, developers, and such but part of me likes to think she is sitting in her impeccably decorated office thinking these things up).
It really doesn’t get any easier than this. Choose your stencil and apply it to the bottle. Add a small amount of paint to your pouncer/stencil brush, and wipe off excess. Too little paint is better than too much paint, too much paint can bleed under the stencil. Then you just paint over the stencil. I had some trouble staying within the template, so I would recommend keeping a paper towel handy to wipe off the craft paint if this happens to you.
You can go over it once or twice for a more intense tone. While the paint is still wet, peel stencil off and stick onto the next spot. I dabbed mine with a paper towel to remove any wet paint on the stencil.
Once you’ve achieved your desired design, let it dry for a bit and finish with a coat of clear protective spray to protect your work.
And that’s it! Spray paint drying aside, the entire project can be done in less than an hour.

I’m also dying to get my hands on these to make some nautical and beach inspired things.

Pingback: Yoga For You | Tulips & A Terrier
Pingback: DIY Stenciled Votives | Tulips & A Terrier
Pingback: Mercury Glass Wine Bottle Vases | Tulips & A Terrier
Pingback: Ombre Wine Bottle Vases - Tulips & A Terrier