
Hello friends! I hope you’re all having a great week! Today, I have a question for you. Have you ever been preoccupied by glittering? Meaning, you have an upcoming opportunity to cover something with glitter and have difficulty concentrating on anything else? No? Just me?
Well, I fall victim to this little predicament more often than I would like to admit. I wish I was kidding. Recent examples include a lunchtime trip to Michael’s, where I purchased a jar of gold glitter and literally could not think about anything else for the rest of the day. I just needed the workday to be over so that I could go home and cover everything I own in glitter.
With a barely used Martha Stewart glitter set sitting in the house, I should have known that this feeling would strike again. And it did.

You see, my Sunday routine normally goes – grocery shopping, laundry, and THEN I’m free to indulge in some fun (i.e. glittering). So, when I picked up these babies at Stop and Shop, I should have been able to predict that the day was pretty much doomed.

Having seen Martha’s own glittered pumpkins, I could not wait to try this for myself! And again, could not think about anything else. I tried to get through the laundry, telling myself that the pumpkins and glitter will still be there when the laundry is folded.

I made it to the dryer cycle of load # 2. I then succumbed to my inner child made the mature and rational decision to get the glittering out of my system and let the pumpkins dry while I folded the laundry. After all, I’m the adult around these parts. No one can MAKE me finish laundry before I start glittering.
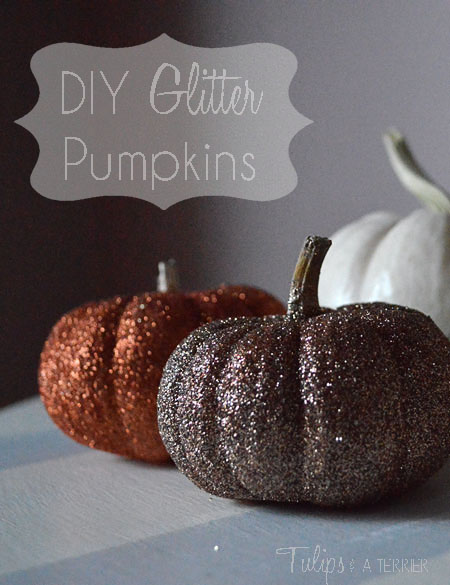
The glittering is as simple as it gets. I used spray adhesive just because that’s what I had on hand, but undoubtedly you can also use regular glue.
You just spray a part of the pumpkin with the spray adhesive, sprinkle on glitter to coat. And just shake off the excess. Continue working around pumpkin until fully covered. I would suggest working on parts of the pumpkin rather than the whole thing as spray adhesive dries rather quickly. I would recommend cutting up a piece of kraft paper to lay over your surface since there is quite a bit of extra glitter left over which you can recycle by folding up the paper and pouring it back into the jar.

In Martha’s video, she makes an excellent point that you should not hold the pumpkin by the stem, as the stem can break off. I regret not listening to Martha as one of my pumpkin stems did break off, and the pumpkin dropped into my pile of recycled glitter. I should have known better.
I sprayed them with a quick coat of protective spray to keep the glitter from spreading throughout the house (although I still fail to understand why anyone would have a problem with this).

And done! This was taken while they were still drying. Once dry, I transferred them to my newly made over entryway table. I love the way they look against the white pumpkins we picked up a few weeks ago! In hindsight, I should probably have done this with plastic pumpkins that I wouldn’t have to throw out. But there’s always next year! And more chances to play with glitter!

P.S. – what do you guys think of the new header?


Nice!
Thank you Sossy 🙂
Love these! And they match with your new banner 🙂
Amy @ Homey Oh My! recently posted…DIY Mercury Glass Votive Candle Holders
Thanks Amy!! I do love me some glitter 🙂
Pingback: Glittered Pumpkins (Encore!) | Tulips & A Terrier