

Now, I know what you’re thinking. ANOTHER throw pillow post? How many throw pillows does one person need?! That’s the beauty of it, friends. They’re so darn fast and easy to make, you can just change them up whenever you’re looking to freshen things up! And it’s no surprise that I love anything with lace trim, so it was only a matter of time before I attempted a lace trim throw pillow.
Making a lace trim throw pillow is no more difficult than making a regular throw pillow. Just add some lace!

I shared a handy little diagram for making a basic envelope pillow when I posted the stenciled throw pillows a while back. Here it is again in case you missed it!
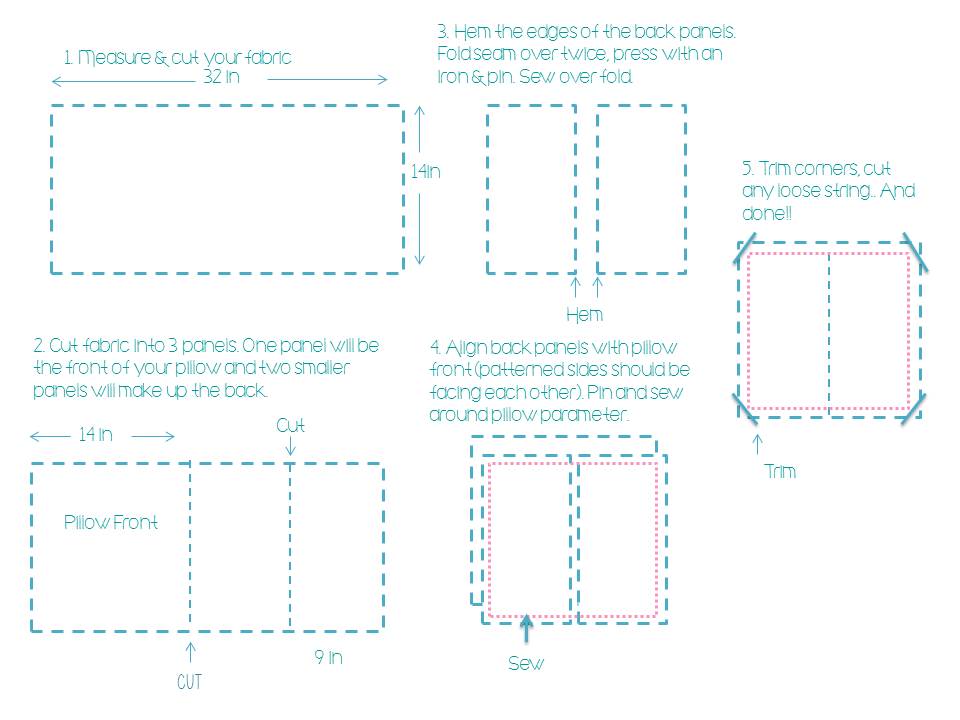
Start off by ironing your fabric to ensure your measurements are accurate. Then you want to cut out a piece of fabric to fit your pillow form. My form was a 14” square, so my piece of fabric was 14″ by 32”. Basically, your fabric should measure a front piece that’s the size of the pillow form and two back pieces that are as wide as your form but overlap slightly. Included below are some guidelines for how much fabric you should have for common pillow sizes.
- 12” pillow – 12” by 28″ piece of fabric cut into one 12″ by 12″ piece, and two 12″ by 8″ pieces.
- 14” pillow – 14” by 32″ piece of fabric cut into one 14″ by 14″ piece, and two 14″ by 9″ pieces.
- 16” pillow – 16” by 36″ piece of fabric cut into one 16″ by 16″ piece, and two 16″ by 10″ pieces.
- 18” pillow – 18” by 40″ piece of fabric cut into one 18″ by 18″ piece, and two 18″ by 11″ pieces.
Once you’ve cut out your three pieces of fabric, set the back panels aside for a while and start by attaching the lace to the pillow front. Cut the lace trim to a little wider than your fabric and lay flat to pin. If you’re using a ruffled, flared lace as I was..make sure the band where you plan to sew it is flat but not stretched.

If you don’t plan to overlap your lace, you can just pin as many lace strips as you plan to use at the same time and then sew them all. But, if you’re overlapping them, I would recommend going one at a time.

Attach lace trim to pillow front by sewing along the band where the stitch won’t be visible. After sewing on the first strip of lace, pin on the second piece in the desired position.

Drape the first piece of lace over the second to make sure you like the way it looks before sewing it on.

Continue on until you’ve achieved your desired lace pattern! Once desired lace pattern is achieved, proceed with pillow making! Press and pin the seams of the envelope opening in the back, sew into place.

Layer the two back pieces onto the pillow front with the lace and pin into place. Now, as obvious as it may seem, I’ve made this mistake in the past – make sure the lace front is on the inside. You should be looking at the folded sides of the back panels.

Sew around the perimeter of the pillow case and trim off any excess fabric/lace. You also want to cut off the excess fabric in the corners (as shown in step 5!).

Insert pillow form, and done!

What do you think?? I love how the gray contrasts with the white lace!
I’m not sure if you remember those burlap throw pillows a few months ago, but they never really found a place in our home. They seemed to shed an awful lot and weren’t exactly cozy..so I decided to switch things up with these. That’s the best thing about throw pillows in my opinion. If you don’t love them or could use something new, it’s super easy to update them!

Shared at That DIY Party!


Nice! good job Lusine.
Love,
Sossy
Thanks Sossy! 🙂