

So, I have a bit of a confession to make. While I take great pride in my gift wrapping abilities, I’m guilty of buying those coordinated packages of wrapping paper, ribbon, and bows. You know, ten bucks for three rolls of wrapping paper, about a dozen bows, and some ribbon in complementary colors. Sure, I end up with some pretty presents..but it feels like I’ve let someone else do the fun part. This year, I decided to get a little creative and DIY some giftwrap!
I started with some brown paper bags and postage paper from the dollar store and added some embellishments!
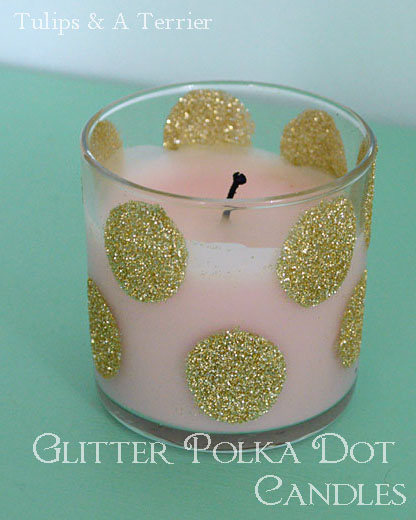
This glitter polka dot technique is one of my favorites (I’ve used it on everything from candles, to wine bottles, to mason jars!). Why not extend the idea to giftwrap! I mean, who doesn’t love glitter polka dots, right?

Materials:
- Glitter (my Martha Stewart glitter set is the gift that keeps on giving)
- Round foam pouncers
- Mod Podge
- Paper bags
- small paintbrush to fill in gaps
These adorable glitter polka dots are way easier to create than you would think! Pour out a little bit of Mod Podge ( I usually use a paper plate). Dip pouncer in Mod Podge, making sure the entire surface area is coated. Wipe any excess around the edges off on a paper towel.

Press pouncer firmly onto surface. You can twist it around a bit to make sure you have a full circle of Mod Podge but try not to move it away from where you originally placed it.
Sprinkle with glitter! Be sure to cover the entire circle (don’t worry about the excess glitter around the edges, it will only stick to the area covered in Mod Podge).

For the second bag, I tried to save some time by using a larger pouncer. Bigger polka dots means you don’t need as many to cover the surface. About halfway through it occurred to me to make a couple of polka dots at a time, which made the process move even faster. Press down two or three rounds of Mod Podge, and sprinkle all with glitter.

You probably want to lay down a piece of the postage paper on your glittering surface to catch the excess glitter. I usually lay down a large sheet to cover the area and a smaller piece on top that I can easily fold to dump the excess glitter back into the tube.

Once desired polka dot pattern is achieved, gently tap the bag on the side to remove excess glitter. If you have any sparse looking spots, you can easily fill them in with some Mod Podge and a paintbrush and sprinkle on more glitter.

Add some ribbon and a pretty gift tag and you’re done! At this point, I realized that my ribbon supply is seriously lacking! A thicker ribbon would have been ideal, but I didn’t have the time to run out for more, so I used what I had on hand. Also, I cannot tie a straight bow to save my life..this is where the glue gun comes in handy.
If the glitter isn’t your thing, you can easily dress up plain postage paper using a some craft paint! I used the back end of a pencil to add polka dots! A word of advice, try this out on a piece of scrap paper first and make sure you have a good amount of paint on the eraser. I had to re-wrap a couple of presents because my first attempt didn’t go as planned.

Again, add some ribbon and a pretty tag (I found these at Home Goods!)

Considering the fact that the bags were 2/$1 and that a dollar buys you a fairly large roll of postage paper, this is much more sensible than buying the pre-coordinated packages!

I’d love to hear what you think! What’s your go-to style for wrapping presents?
Shared at That DIY Party!
* Post contains affilate links

These are all so cute and pretty, Lusine! Looks like we both went with polka dots this year 🙂 It’s a no brainer!
Thanks Amy! I totally thought the same thing when I saw your gorgeous gifts! Polka dots are a given as far as I’m concerned 🙂
Pingback: Hosting The Perfect Holiday Party! | Tulips & A Terrier