

Hello friends! I hope you’re all enjoying the first few days of summer! First, I’d like to apologize for disappearing yet again. It has been a hectic couple of months for me and it feels like weeks fly by in the blink of an eye..and then I notice that it’s been over a month since my last post. I’ve actually had this project done and photographed for a while, I just haven’t found the time to sit down and write a post.
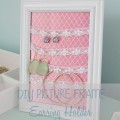
Well, I won’t hold out on you any longer! Because if you have $2 (plus tax), and some basic supplies on hand, you too can add a lovely, custom made floral picture frame to your home!
As you may have noticed from previous posts (such as this one, and this one), I regularly scour the dollar store for DIY project ideas. I just think it’s the perfect way to experiment with ideas that might or might not work because it’s practically free. If something doesn’t work out, you aren’t going to lose sleep over the $2 you’ve wasted trying (and if it does work…win!)
And in case you didn’t already know, the dollar store sells faux flowers. The large majority of them (below included) are the fakest looking of flowers that you would normally never consider displaying in your home.
But if you’re going to glue them to a picture frame and spray paint them, they don’t look too bad. And I don’t think anyone would expect them to be real.

Supplies:
- Faux flowers
- Picture frame with a flat surface (I would aim to have it be on the wider side to allow more room for flowers).
- Spraypaint
- Hot glue gun
- Scissors
So, I totally did not realize that the white spray paint I had been using was actually primer until I went to take the above picture. I suppose if I haven’t noticed a difference yet, there’s probably no sense in trekking to Home Depot and buying another bottle. So, if you’re in the same predicament..primer works just fine!
Use the scissors to cut the faux flower blossoms off of the stem. If you are using better quality flowers, you may need wire cutters for this step. A regular pair of scissors worked just fine on the flowers from the dollar store.

Glue your flowers to the frame using a hot glue gun. You want the back of the flower to stick right onto the frame, so if the back of your flower isn’t completely flat, you can nudge it into a corner as I did! 
Once the flowers have been secured to the frame, allow the glue to dry for a few minutes and proceed to paint!

I applied two thin coats of paint and it looked opaque enough for my liking. But, as I previously mentioned, I had inadvertently used primer to paint my frames. Just be sure to apply thin even coats and continue to add coats until you’re happy with the color. I would recommend wearing disposable gloves so that you can move the floral petals around as painting to allow you to coat the inside.

And that’s pretty much it. You just allow the frame to dry (spraypaint dries super fast in this weather!) and fill with a photo of your choice!

I love using kraft paper as the backdrop for black and white photos. It just looks so classic, no?
I’d love to hear what you guys think! Have you found any creative uses for those tacky dollar store flowers? I could use some ideas for the other half of the bushel :).

Good call on spray painting the flowers. It really elevates them! And what’s the story behind the photo??
Amy @ Homey Oh My! recently posted…DIY No Sew Sunglasses Pouch
Thanks Amy! Kind of surprised you haven’t already thought of it. The photo is the only presentable one of me and the boyfriend taken at my best friend’s wedding. It’s often thought to be our own (nonexistent) wedding photo from the color of the dress 🙂